Friday, 29 February 2008

Backgrounds

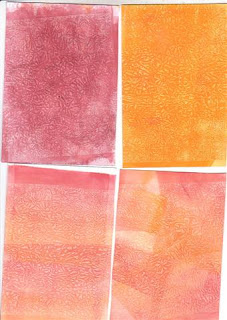
Waxed paper resist.


Water sprayed through stencil onto watercolour paper. Then oversprayed with coloured sprays.


Brayered Pigment reinkers

ATCs February


These are the ATCs for February's regular 10:9 swap. I took the photos in the garden last Sunday in the glorious spring sunshine. The pink, orange and yellow background was created from watercolour paper and twinkling H2Os. The turquoise one used colour sprays.

Tuesday, 26 February 2008

Deco page


This is a page I decorated in a deco book that arrived for me yesterday. These little books get posted from person to person and each does a page until they finally return to their owner. Stamps by Crafty Individuals and Catslife Press.

Friday, 22 February 2008

More backgrounds

This time I decided to play with some waxed paper resists. It is an older technique but I haven't used it before. It has taken me a long time to track down any waxed paper. I crumpled up sections of waxed paper and ironed it on some card. This then resists any ink applied. I tried both glossy and normal card stock with distress and spray ink.


These are the results of the experiments. I tried applying the inks direct to a brayer, laying the ink onto a non stick mat and placing the card on top (with water for the distress inks) and taking the ink off the mat with the brayer. I found the best result for the glossy were where I applied distress inks to the non stick mat, didn't spray with water then picked it up on the brayer to apply. I could then make coloured stripes without a rainbow pad. I also got good results with distress ink direct to the brayer then on glossy but it's harder to get multi colours. I found the best results for the spray inks were on the normal card stock and I could apply direct to the card and then brayer . Applying distress inks to the mat, spraying with water then dipping the normal card in also worked but gave quite washed out colours so if I want stronger colours I would have to repeat a few times. If I'm doing lots of these then that will take much longer.

If I inked the brayer with distress inks and used normal card the ink was absorbed too much and I had to keep reinking and the coverage was very patchy. It might work better if I spritz the brayer with water. Will try that next time.

My favourites scanned - still difficult to see but better than the photo I think.


.

Wednesday, 20 February 2008

Tyvek experiments

Been playing with some Tyvek in preparation for another chunky book. I have tried heating it with a heat gun and an iron and can't really get anything I like. I made some embossed bookmarks for Christmas so I thought I'd have another go at embossing it and colouring it with inks. The cuttlebug folders give a nice deep impression in the tyvek which means the ink picked up the pattern well. I did try using a brass stencil through the wizard but as the impression wasn't as deep it was harder get it inked well. The best effort using a brass stencil was the fern in the bottom picture which I liked. I tried another stencil but the pattern got lost when I tried inking it up. I've experimented before with colouring the tyvek then embossing then using inkpads to pick up the texture and I think that's maybe what I'll do next time.

Background blitz

I have lots of projects that need backgrounds coming up so I've spent all my time making lots of different backgrounds. I need some for ATCs and some for bigger sheets. I have to be able to make lots of the bigger sheets so I need to bear that in mind when I decide what to do. I have had my water spray going full blast trying out effects when spraying water or dripping water onto various inks and sprays.


Brayed rainbow ink. Then sprayed with red shimmer mist. The bottom left one was the effect of leaving it to run. The other two were sandwiched together and dragged apart. Might have added some water spray too but I can't remember now.

Glossy card and Marvy Metallics. I sprayed water on the top and either let it run or used a piece of waxed paper to slodge it a bit (just what happened to be in reach at the time). Some had water sprayed before and after the markers, some just afterwards. The blue/green/silver ones on the bottom right were ordinary card placed into Marvy Metallics and water on a non-stick mat.


Glossy card sprayed with colour spray then sprayed with water to make interesting effects. The top right hand one had water sprayed through a stencil before the colour sprays.

Used gesso onto card - some brushed, some sponged. Then put distress inks onto non-stick mat, sprayed with water then put card onto the top. I repeated until the colour was strong enough. I then dripped water onto some of them to make those spodges. I think the middle top one didn't have any gesso on that side - I turned it over to see what it was like with just the water spodges.

Distress inks plus water plus colour spray. The left hand one has the ink pad direct to the paper, the right hand one used a sponge to apply ink. Then tried dripping water onto it to give spodges but it didn't seem finished so I sprayed a red shimmer spray over the top.

Twinkling H2Os onto watercolour paper. These look really effective when they are cut up into ATC sized pieces but don't look so good as large sheets. I was originally planning to use these for one of the ATC swaps.

Different combinations of colour spray. My favourite quick backgrounds at the moment.


Wall paper and colour sprays. Rubbed ink pad over the bottom one. Dont' really like these.


Sprayed water through stencil onto watercolour paper and used colour sprays.

Sunday, 17 February 2008

Paper weaving


Black background with slits in it. Laced in some spray coloured paper. Then stamped over the top and gold embossed. Added some wire and beads and the butterfly

Saturday, 16 February 2008

More little beauties


I created these mini pieces for a little beauties swap. It was a great opportunity to use up lots of small pieces of background I had left over from all sorts of things. Most of the backgrounds were created using colour sprays. I used a variety of stamps including some from Crafty Individuals and Invoke Arts. A lot of the pictures stuck onto the pieces are from scrapgirls. The larger silvery piece on the top left hand corner was a piece of mountboard with thick black gesso on it which I stamped. When it was dry I used rub n buff over the top.

Bird tip in page


The backgrounds are colour sprays and I have used several stamps to create a collage type background. I used my own stencil for the humming bird created using a graphics package and a threshold layer. The other stencils I created from some shapes from the scrapgirls digital templates. All were printed onto acetate and cut out. I sponged some adirondack through the stencils. The large words used a pen and a standard letter stencil. I edged parts of this in a silver gel pen but that doesn't show up so well on the scans.

Saturday, 9 February 2008

Deco Book Round Robin


I have joined a deco book round robin so have made a little book to go travelling to other people so they can decorate a page each then send it on. I will decorate the covers when it returns to me.

Tuesday, 5 February 2008

Mulberry resist


This is a piece of mulberry paper with images stamped in versamark and embossed. I sprayed using colour sprays and then ironed between two pieces of paper to give this beautiful resist effect. One thing I learnt is that if this sheet sticks to the paper above don't panic, keep ironing and it eventually peels away. I used my encaustic iron which is probably not as hot as a proper iron. I saw this technique on Sweetpea's blog in her background book.

Monday, 4 February 2008

Valentine Countdown

Thanks to Lisa Vollrath there is another countdown here. Go and have a look

Decorated box


The beads are from a bead swap and made by Linda Strawn.

Sunday, 3 February 2008

ATC box prototype


I have made a quick prototype of an ATC box using plain mountboard just to check how to contruct it and the sizing. It seems to have worked OK so now I can unlace it and decorate. I need to make a new side because I punched the top by accident. I used the Bind it all machine to punch the holes and to put in the binding to make the hinge for the top. Haven't decided what to lace the final version with - I could do a continuous lacing as in the photo or I could tie each hole separately using ribbon. I just used some yarn for this one that was thin enough to go through my needle to see how it came together.

Edit: I have remembered now that I saw a box made with a bind it all machine in Craft Stamper and managed to dig out the copy and it was in August 2007. Phew, glad I found that.

Saturday, 2 February 2008

Friday, 1 February 2008

Chalk and sprays


I combined one of the chalked images with a background using the water spray and stencil to create this card for a swap.